Author: Lawrence Albert Pardo-Ilao - Naga City, Philippines

Free! Guitar Tutorials and Chords!

New! VB.NET HTML5 and CSS3 Tutorials!

Unlock For Us

How to display Process ID from command prompt

Process Identifier is a unique number automatically being assign to each processes for identification. The representation is given in decimal number.

Here’s how to find each programs process ID using command prompt.

Using the command Tasklist to display and find each process ID

The small utility displays a list of processes running on either remote or local machine. It includes Image Name or program name, Process ID, Session Name, Session number and memory usage.

C:\Windows\system32>tasklist

Image Name                                        PID Session Name
========================= ======== ===============
System Idle Process                                0 Services
System                                                 4 Services
smss.exe                                            264 Services
csrss.exe                                            416 Services
csrss.exe                                            472 Console
wininit.exe                                          480 Services
services.exe                                       532 Services
lsass.exe                                            556 Services
lsm.exe                                              564 Services
winlogon.exe                                       576 Console
svchost.exe                                        696 Services


Using the command QPROCESS

The utility displays information about processes. It includes the Username running the program, Session Name, ID, Process ID and Image name or program name.

C:\Windows\system32>qprocess |more

USERNAME      SESSIONNAME         ID   PID  IMAGE
>hp                    console              1   1856  dfdwiz.exe
>hp                    console              1   2036  dwm.exe
>hp                    console              1   1724  taskhost.exe
>hp                    console              1   1860  explorer.exe
>hp                    console              1   2084  vcddaemon.exe
>hp                    console              1   2108  igfxtray.exe
>hp                    console              1   2116  hkcmd.exe
>hp                    console              1   2128  igfxpers.exe
>hp                    console              1   2156  fdm.exe
>hp                    console              1   2188  wweb32.exe
>hp                    console              1   2236  igfxsrvc.exe
>hp                    console              1   2740  wuauclt.exe


Using the command wmic to display each programs PID

Windows Management Instrumentation command-line (WMIC) enables systems management from the command line. It extends the built-in Windows Management Instrumentation (WMI) for interfaces from several command-line usages and through batch scripts.

C:\Windows\system32>wmic process get name,processid
Name                                  ProcessId
System Idle Process                   0
System                                    4
smss.exe                               264
csrss.exe                               416
csrss.exe                               472
wininit.exe                             480
services.exe                           532
lsass.exe                               556
lsm.exe                                 564
winlogon.exe                          576
svchost.exe                           696


Overall, PID or Process Identifier helps us in identifying each program or processes through a decimal representation. These decimal equivalent is unique and can be use for monitoring and other applications.

That’s it! Keep on reading!


Read more...

Unlock For Us

Activate the IE browser Full Screen feature using a Windows Registry option

There is an option at Windows Registry that makes the Internet Explorer run at Full Screen. It will enable Full Screen display - a nice to have feature for “Touch” sensitive Tablet computers.

Here’s how to use the feature at Windows Registry.

Open the Registry Editor by typing “regedit” at start menu search or Run Window (Winkey + R) and proceed to the registry folder below:

HKEY_CURRENT_USER\Software\Microsoft\Internet Explorer\Main

Double-click the value name FullScreen and use the data value “yes” to activate the feature and “no” to disable – That’s it!

registry

Using RegDevelop to add the function and create your own TweakUI application

regdevelop

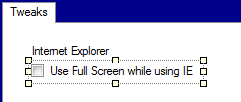
Simply drag and drop the CheckBox control as shown and use the settings below:

Caption

Use Full Screen while using IE

RegKeyPath1

HKEY_CURRENT_USER\Software\Microsoft\Internet Explorer\Main

Value_Name1

FullScreen

ValueData1

yes

ValueType1

String

DeleteWhenUnchecked

False (after using the value of false, it will automatically fill-up all the unchecked settings and just change “yes” to “no” of ValueData2)

ValueData2

no

That’s it! Press the Start Button to test the program and Build Now Button to share your created tools.

Keep on reading!


Read more...

Unlock For Us

Enable the Menu Bar at Windows Explorer and IE using Windows Registry

If you don’t know where to look for the menu options – File, Edit, View and Tools, here’s a way to get them back using your registry editor. All you need to know is to look for it’s registry folder location and Value name.

The Internet Explorer or IE

Registry Key Path (Registry Folder)

HKEY_CURRENT_USER\Software\Microsoft\Internet Explorer\MINIE

Open the registry folder as administrator - simply type “regedit” and It will ask “Do you want to allow the following program to make changes to this computer?”, Click YES.

Once the tool is open, go to the registry folder above and find AlwaysShowMenus. If you can’t find the value name, Create by using your Right-click menu function at any vacant space, click New-> DWORD (32-bit) Value and type AlwaysShowMenus. Once you’re done, double-click the value name and change its value data to 1.

For Windows Explorer

The procedure is very similar for Windows explorer, you just need to find the registry folder location and look for AlwaysShowMenus value name.

HKEY_CURRENT_USER\Software\Microsoft\Windows\CurrentVersion\Explorer\Advanced

If you can’t find the option, create the value name AlwaysShowMenus as DWORD and enter a value of 1.

That’s it!

Creating these TweakUI Functions using Regdevelop

If your handling many computers and you want to create a tool that can patch these registry functions easily – use RegDevelop. It’s an easy way to create and compile your tweaks into one application.

dragdrop 

Drag and drop the Checkbox control to the form designer, change its caption and settings as shown below:

Caption

Show IE Menu Bar

RegKeyPath1

HKEY_CURRENT_USER\Software\Microsoft\Internet Explorer\MINIE

Value_Name1

AlwaysShowMenus

ValueData1

1

ValueType1

DWORD

DeleteWhenUnchecked

True

For the other tweak, same thing – just use the procedure above and test the program by clicking the Start option and Build Now button after checking – That’s it!

Keep on reading!


Read more...
Enable the Registry Editor, Task Manager and Folder Options using Command Prompt

Most of the viruses today when your computer is infected disables the registry editor, folder options and task manager. Here’s how to re-enable them from command prompt.

Note: you must be running (cmd.exe) as administrator or else you’ll get “access is denied” – Type “cmd” on start search and press CTR+ALT+ENTER and select continue.

Re-Enable the Task Manager from command line

reg.exe ADD HKCU\Software\Microsoft\Windows\CurrentVersion\Policies\System /v DisableTaskMgr /t REG_DWORD /d 0 /f

Enable the Registry Editor from Command Prompt (XP only)

reg.exe add HKCU\Software\Microsoft\Windows\CurrentVersion\Policies\System /v DisableRegistryTools /t REG_DWORD /d 0 /f

Unhide and enable Folder options using command prompt 

Current User

reg.exe ADD HKCU\SOFTWARE\Microsoft\Windows\CurrentVersion\Policies\Explorer /v NoFolderOptions /t REG_DWORD /d 0 /f

Local Machine

reg.exe ADD HKLM\SOFTWARE\Microsoft\Windows\CurrentVersion\Policies\Explorer /v NoFolderOptions /t REG_DWORD /d 0 /f


Creating a program for these commands using RegDevelop

regdevelop

Drag and drop the button control and configure the settings as shown above:

--------------------------------------------------------------

Caption

Task Manager

StartProcess (The settings came from the commands above)

reg.exe ADD HKCU\Software\Microsoft\Windows\CurrentVersion\Policies\System /v DisableTaskMgr /t REG_DWORD /d 0 /f

WindowStyle

Hidden

--------------------------------------------------------------

Continue with the settings for the registry editor and folder option, click the build button once you’re done.

That’s it! Enjoy!


Read more...

Unlock For Us

How to re-enable the Start Task Manager option located at the taskbars Right-Click Menu

“Task Manager has been disabled by your administrator” - If a malicious software invades your computer and prevents users from accessing the Task Manager (Taskmgr.exe), here’s a way to re-enable the option using an application created by regdevelop and using your windows registry.

Overview

The Task Manager lets users re-start and disable programs to run; you can monitor each computers performance; see all apps running including services; see the executable names of every programs; and change the priority of the processes in which apps run.

Method 1: Using the created program by RegDevelop

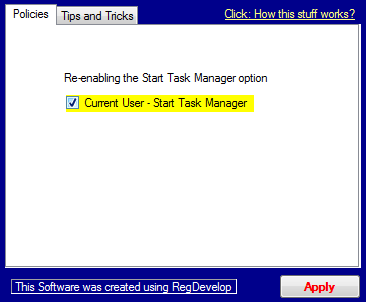
Download the application here, simply checked the option and click the Apply Button.

app_enable


Method 2: Using Windows Registry to re-enable the option

Open your windows registry editor (regedit.exe) and proceed at the registry folder below:

HKEY_CURRENT_USER\Software\Microsoft\Windows\CurrentVersion\Policies\System

Once your inside the folder, create a new dword value named DisableTaskMgr and put 0 as its data value.

You’ll noticed immediately that the Start Task Manager option is now enabled – That’s it!

If the option doesn’t work, try the registry settings below:

HKEY_CURRENT_USER\Software\Microsoft\Windows\CurrentVersion\Group Policy Objects\LocalUser\Software\Microsoft\Windows\CurrentVersion\Policies\System
"DisableTaskMgr"=dword:00000000

HKEY_LOCAL_MACHINE\SOFTWARE\Microsoft\Windows\CurrentVersion\policies\system
"DisableTaskMgr"=dword:00000000


Method 3: Creating your own policy maker application using Regdevelop (How method 1 was created)

Drag and drop one label and one checkbox control at the form designer and change the different settings. Just follow the settings below:

Label Caption

Re-enabling the Start Task Manager option

Checkbox Control

Caption

Current User - Start Task Manager

RegKeyPath1

HKEY_CURRENT_USER\Software\Microsoft\Windows\CurrentVersion\Policies\System

Value_Name1

DisableTaskMgr

ValueData1

0

ValueType1

DWORD

DeleteWhenUnchecked

False (after setting this value, it will automatically fill-up all unchecked settings)

That’s it! Just press the Start button for checking and finally, click the Build Now button after testing the program.


Keep on reading!


Read more...

How to Hide all Notification Area or System Tray Icons

systemtray_Icons

The system tray area is located on the right-side of the taskbar as shown above and contains icons that provides us the status about each program functions like new messages to your e‑mail, daily software updates, and network connections.

Here’s how to hide all the system tray icons using Windows registry.

Open the registry editor (regedit.exe) and explore the reigstry folder below:

HKEY_CURRENT_USER\Software\Microsoft\Windows\CurrentVersion\Policies\Explorer

To hide all icons, create a New dword value named NoTrayItemsDisplay and put a value of 1. To take effect, restart your computer – That’s it!

To unhide, simply put a value of 0 or delete the value name.


Create your own Policy applying program using Regdevelop

form_regdevelop

Regdevelop is a program that has the ability of creating your own tweakui like applications. The program lets you re-invent and create your own application for policies and customizations.

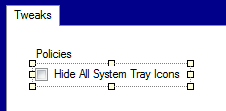
Drag and drop the label and checkbox control as shown above and change its caption and other settings as written below:

Caption

Hide All System Tray Icons

RegKeyPath1

HKEY_CURRENT_USER\Software\Microsoft\Windows\CurrentVersion\Policies\Explorer

Value_Name1

NoTrayItemsDisplay

ValueData1

1

ValueType1

DWORD

DeleteWhenUnchecked

True

That’s it! Just press the Start button for testing and finally, click the Build Now button after checking the program.

Enjoy!


Read more...

Unlock For Us

How to make a disk drive invisible or hidden using Windows Registry and Command Prompt

Want to hide your personal files by making your hard disk invisible to other users? Having some problem with your privacy if you have a common PC with your family?

Here’s how to create an “invisible” hardisk drives – the easy way using only the built-in tools in your computer.


HIDE ANY HARD DRIVE USING THE COMMAND PROMPT 

Press the Win key, at search type “cmd” and press CTRL+SHIFT+ENTER to run the command prompt as administrator.

Once the command prompt interpreter is open, we’ll use the tool diskpart to remove and hide the drive. Here’s the summary of commands:

- diskpart

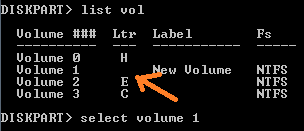
- list vol     (to display the list of drives available in the system)

- select volume [number]  => the command selects the drive that you want to hide

- remove letter=[drive letter]   => the command removes the drive letter and later hides the drive.

-----------------------------------------------------------------

Microsoft Windows [Version 6.1.7601]
Copyright (c) 2009 Microsoft Corporation.  All rights reserved.

C:\Windows\system32>diskpart

Microsoft DiskPart version 6.1.7601
Copyright (C) 1999-2008 Microsoft Corporation.
On computer: HPMINI-PC

DISKPART> list vol

  Volume ###  Ltr  Label        Fs     Type        Size     Status     Info
--------  ---  ----------  -----  ---------  -------  ---------  ------
  Volume 0     H                       DVD-ROM         0 B  No Media
  Volume 1     D   Disk       NTFS   Partition     34 GB  Healthy
  Volume 2     E               NTFS   Partition     41 GB  Healthy
  Volume 3     C               NTFS   Partition     73 GB  Healthy   System

DISKPART> select volume 1

Volume 1 is the selected volume.

DISKPART> remove letter=d

DiskPart successfully removed the drive letter or mount point.

afterremove_drive

The trick should hide the disk drive as shown above.


TO UNHIDE THE DISK DRIVE

Repeat the steps above and use the following command to re-assign the driver letter and later, unhide the hard drive.

DISKPART> assign letter=d


USING WINDOWS REGISTRY TO HIDE DRIVES (regedit.exe)

Windows registry data name NoDrives can hide any drives or set of drives at the same time using the registry folder below:

HKEY_CURRENT_USER\Software\Microsoft\Windows\CurrentVersion\Policies\Explorer

Create a new dword value named NoDrives and use the value of 8 in decimal for the Drive D as shown below. To take-effect, restart your computer.

registrysetting 

To get the other drives, here’s how to calculate the Data in decimal form:

formula n is the position of the drive according to alphabet

For example the drive F, since it is in 6th position at the alphabet, we can know the NoDrives decimal value by using the formula above

(6 - 1)  = 5    and 2 raise to 5 is 32

To Hide drive F, just use the value 32.

That’s it!

How about hiding two or more drives using Windows Registry?

It’s easy! Just add the two or more values: Let’s try drive F and I.

(9 – 1) = 8   and 2 raise to 8 is 256

Therefore, F + I = 32 + 256 = 288

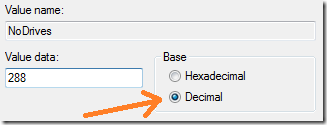
Using the value of 288 it will hide the Drive F and I.

decimal 

Note: Remember to set the value in Decimal.

Another example is hiding the drives C and E => 4 + 16 = 20

Enjoy!


Read more...


© UnlockForUs 2007-2022 | Blogger| License Agreement